
This chapter provides advanced developer tips for Chaos Monkey and other Chaos Engineering tools, including tutorials for manually deploying Spinnaker stacks on a local machine, virtual machine, or with Kubernetes. From there you can configure and deploy Spinnaker itself, along with Chaos Monkey and other Chaos Engineering tools!
How to Install AWS CLI
Start by installing the AWS CLI tool on your machine, if necessary.
You can make future AWS CLI commands easier by creating AWS profiles, which will add | configuration and credentials to the local ~/.aws/credentials file. In some cases you'll | be using two different accounts/profiles, so you can add the credentials for multiple | accounts to ~/.aws/credentials by using aws configure --profile <profile-name> commands.
aws configure --profile spinnaker-developer
AWS Access Key ID [None]: <AWS_ACCESS_KEY_ID>
AWS Secret Access Key [None]: <AWS_SECRET_ACCESS_KEY>
Default region name [None]: us-west-2
Default output format [None]: text

aws configure --profile primary
AWS Access Key ID [None]: <AWS_ACCESS_KEY_ID>
AWS Secret Access Key [None]: <AWS_SECRET_ACCESS_KEY>
Default region name [None]: us-west-2
Default output format [None]: text |`
In the future, simply add the --profile <profile-name> flag to any AWS CLI command to | force AWS CLI to use that account.
How to Install Halyard
Halyard is the CLI tool that manages Spinnaker deployments and is typically the first step to any manual Spinnaker setup.
-
Download Halyard installation script.
-
For Debian/Ubuntu.
curl -O https://raw.githubusercontent.com/spinnaker/halyard/master/install/debian/InstallHalyard.sh -
For MacOS.
curl -O https://raw.githubusercontent.com/spinnaker/halyard/master/install/macos/InstallHalyard.sh
-
-
Install Halyard with the
InstallHalyard.shscript. If prompted, default options are usually just fine.sudo bash InstallHalyard.sh -
Source your recently-modified
.bashrcfile (or~/.bash_profile).. ~/.bashrc -
Verify Halyard was installed by checking the version.
hal -v # OUTPUT 1.9.1-20180830145737 - That's the basics! Halyard is now ready to be configured and used for manual or quick start Spinnaker deployments.
How to Install Spinnaker
This section walks you through the most basic Spinnaker installation process, suitable for simple Spinnaker deployments.
-
Use the
hal version listcommand to view the current Spinnaker version list.hal version list -
Configure Halyard to use the latest version of Spinnaker.
hal config version edit --version 1.9.2 -
(Optional) Enable Chaos Monkey in the Halyard config.
hal config features edit --chaos true -
Tell Halyard what type of environment you're deploying Spinnaker to. Most production setups will want to use Kubernetes or another distributed solution, but the default deployment is a local installation. The
hal config deploy edit --typeflag can be used to change the environment.hal config deploy edit --type localdebian -
Halyard requires some form of persistent storage, so we'll use AWS S3 for simplicity. Modify the Halyard config and be sure to pass an AWS
ACCESS_KEY_IDandSECRET_ACCESS_KEYwith privileges to create and use S3 buckets.hal config storage s3 edit --access-key-id <AWS_ACCESS_KEY_ID> --secret-access-key --region us-west-2 -
Configure Halyard to use the
s3storage type.hal config storage edit --type s3 -
Now use
sudo hal deploy applyto deploy Spinnaker to the local machine.sudo hal deploy apply - After deployment finishes you should have a functioning Spinnaker installation! If you've installed on your local machine you can navigate to the Spinnaker Deck UI at localhost:9000 to see it in action. If Spinnaker was deployed on a remote machine use the
hal deploy connectcommand to quickly establish SSH tunnels and connect.
Next Steps
You're now ready to install and then start using Chaos Monkey or other Simian Army tools.
How to Deploy a Spinnaker Stack for Chaos Monkey
Manually deploying Spinnaker with the help of Halyard is the best way to have the utmost control over your Spinnaker installation, and is ideal for advanced deployments to EC2 instances, EKS/Kubernetes clusters, and the like. Choose one of the three options depending on your needs.
- Deploying a Spinnaker Stack with AWS Console
- Deploying a Spinnaker Stack with AWS CLI
- Deploying a Spinnaker Stack with Kubernetes
After Spinnaker is running on your chosen platform proceed to our How to Install Chaos Monkey guide to get started with Chaos Monkey!
Deploying a Spinnaker Stack with AWS Console
This section will guide you through deploying a Spinnaker stack with the AWS web console.
Prerequisites
- Install Halyard
- In AWS navigate to CloudFormation and click Create Stack.
- Download this
managing.yamlfile to your local machine. - Under Choose a template click the Choose File button under Upload a template to Amazon S3 and select the downloaded
managing.yaml. - Click Next.
- Input
spinnaker-managing-infrastructure-setupinto the Stack name field. - Select
falsein the UseAccessKeyForAuthentication dropdown. - Click Next.
- On the Options screen leave defaults and click Next.
-
Check the I acknowledge that AWS CloudFormation might create IAM resources with custom names. checkbox and click Create to generate the stack.
NoteIf your AWS account already contains the
BaseIAMRoleAWS::IAM::ROLE you may have to delete it before this template will succeed. -
Once the
spinnaker-managing-infrastructure-setupstack has aCREATE_COMPLETEStatus, select the Outputs tab and copy allkey/valuepairs there somewhere convenient. They'll look something like the following.Key Value VpcId vpc-0eff1ddd5f7b26ffc ManagingAccountId 123456789012 AuthArn arn:aws:iam::123456789012:role/SpinnakerAuthRole SpinnakerInstanceProfileArn arn:aws:iam::123456789012:instance-profile/spinnaker-managing-infrastructure-setup-SpinnakerInstanceProfile-1M72QQCCLNCZ9 SubnetIds subnet-0c5fb1e7ab00f20a7,subnet-065af1a1830937f86 -
Add a new AWS account to Halyard named
spinnaker-developerwith your AWS account id and your appropriate AWS region name.hal config provider aws account add spinnaker-developer \ --account-id 123456789012 \ --assume-role role/spinnakerManaged \ --regions us-west-2 -
Enable AWS in Halyard.
hal config provider aws enable
Next Steps
You're now ready to install Spinnaker and install Chaos Monkey to begin Chaos Experimentation!
Deploying a Spinnaker Stack with AWS CLI
This section will guide you through deploying a Spinnaker stack with the AWS CLI tool.
Prerequisites
- Install Halyard
- Install AWS CLI
-
Download this
managing.yamltemplate.curl -OL https://d3079gxvs8ayeg.cloudfront.net/templates/managing.yaml -
Now we'll use AWS CLI to create the
spinnaker-managing-infrastructurestack via CloudFormation. We want to use theprimaryor managing account for this, so we'll specify the--profile primary, which will grab the appropriate credentials, region, and so forth.aws cloudformation deploy --stack-name spinnaker-managing-infrastructure --template-file managing.yaml --parameter-overrides UseAccessKeyForAuthentication=true --capabilities CAPABILITY_NAMED_IAM --profile primary
SpinnakerInstanceProfile.If you receive the above error while creating the spinnaker-managing-infrastructure stack you may need to edit the managing.yaml file and comment out the two SpinnakerInstanceProfileArn related lines under the Outputs block.
# ...
Outputs:
# ...
# SpinnakerInstanceProfileArn:
# Value: !GetAtt SpinnakerInstanceProfile.Arn-
Once the
spinnaker-managing-infrastructurestack has been created open the AWS console, navigate to theCloudFormationservice, select the Outputs tab of thespinnaker-managing-infrastructurestack. We'll be using theManagingAccountIdandAuthArnvalues in the next step, which look something like the following.Key Value ManagingAccountId 123456789012 AuthArn arn:aws:iam::123456789012:user/spinnaker-managing-infrastructure-SpinnakerUser-15UU17KIS3EK1 -
Download this
managed.yamltemplate.curl -OL https://d3079gxvs8ayeg.cloudfront.net/templates/managed.yaml -
Now enter the following command to create the companion
spinnaker-managed-infrastructurestack in CloudFormation. Be sure to specify the profile value and paste the appropriateManagingAccountIdandAuthArnvalues from above.aws cloudformation deploy --stack-name spinnaker-managed-infrastructure --template-file managed.yaml \ --capabilities CAPABILITY_NAMED_IAM --profile spinnaker-developer --parameter-overrides \ AuthArn=<ManagingStack_AuthArnValue> \ ManagingAccountId=<ManagingStack_ManagingAccountId> -
Add your AWS Access Id and Secret Keys to Halyard.
hal config provider aws edit --access-key-id <AWS_ACCESS_KEY_ID> --secret-access-key -
Add your default managing account to Spinnaker.
hal config provider aws account add default --account-id 123456789012 --assume-role role/spinnakerManaged --regions us-west-2Spinnaker uses
accountsadded via the Halyardhal config provider aws accountAPI to handle all actions performed within the specified provider (such as AWS, in this case). For this example we'll just be using our primary managing account, but you can freely add more accounts as needed. -
Enable the AWS provider.
hal config provider aws enable
Next Steps
With Spinnaker configured it's now time to install Spinnaker and then install Chaos Monkey.
Deploying a Spinnaker Stack with Kubernetes
Follow these steps to setup a CloudFormation EKS/Kubernetes stack for Spinnaker and Chaos Monkey.
Prerequisites
- Install Halyard
- Install AWS CLI
-
Download this
managing.yamltemplate.curl -O https://d3079gxvs8ayeg.cloudfront.net/templates/managing.yamlStack ConfigurationIf you need to configure the stack to your own particular needs you can easily edit the template YAML as necessary. For example, in this guide we're only using a single managing account to handle Spinnaker/Kubernetes in AWS, but if you need to also include additional managed accounts you'll want to add their respective AWS ARN strings to the
managing.yamlfile around this line. -
Now we'll use AWS CLI to issue a
cloudformation deploycommand to create a newspinnaker-managing-infrastructure-setupstack using themanaging.yamltemplate. From here on out this guide will use explicit names where applicable, but feel free to customize options as you see fit (such as the stack name, EksClusterName, and so forth).aws cloudformation deploy --stack-name spinnaker-managing-infrastructure-setup --template-file managing.yaml --capabilities CAPABILITY_NAMED_IAM \ --parameter-overrides UseAccessKeyForAuthentication=false EksClusterName=spinnaker-cluster -
The step above takes 10 - 15 minutes to complete, but once complete issue the following commands, which will use the AWS CLI to assign some environment variables values from the
spinnaker-managing-infrastructure-setupstack we just created. We'll be using these values throughout the remainder of this guide.VPC_ID=$(aws cloudformation describe-stacks --stack-name spinnaker-managing-infrastructure-setup --query 'Stacks[0].Outputs[?OutputKey==`VpcId`].OutputValue' --output text) CONTROL_PLANE_SG=$(aws cloudformation describe-stacks --stack-name spinnaker-managing-infrastructure-setup --query 'Stacks[0].Outputs[?OutputKey==`SecurityGroups`].OutputValue' --output text) AUTH_ARN=$(aws cloudformation describe-stacks --stack-name spinnaker-managing-infrastructure-setup --query 'Stacks[0].Outputs[?OutputKey==`AuthArn`].OutputValue' --output text) SUBNETS=$(aws cloudformation describe-stacks --stack-name spinnaker-managing-infrastructure-setup --query 'Stacks[0].Outputs[?OutputKey==`SubnetIds`].OutputValue' --output text) MANAGING_ACCOUNT_ID=$(aws cloudformation describe-stacks --stack-name spinnaker-managing-infrastructure-setup --query 'Stacks[0].Outputs[?OutputKey==`ManagingAccountId`].OutputValue' --output text) EKS_CLUSTER_ENDPOINT=$(aws cloudformation describe-stacks --stack-name spinnaker-managing-infrastructure-setup --query 'Stacks[0].Outputs[?OutputKey==`EksClusterEndpoint`].OutputValue' --output text) EKS_CLUSTER_NAME=$(aws cloudformation describe-stacks --stack-name spinnaker-managing-infrastructure-setup --query 'Stacks[0].Outputs[?OutputKey==`EksClusterName`].OutputValue' --output text) EKS_CLUSTER_CA_DATA=$(aws cloudformation describe-stacks --stack-name spinnaker-managing-infrastructure-setup --query 'Stacks[0].Outputs[?OutputKey==`EksClusterCA`].OutputValue' --output text) SPINNAKER_INSTANCE_PROFILE_ARN=$(aws cloudformation describe-stacks --stack-name spinnaker-managing-infrastructure-setup --query 'Stacks[0].Outputs[?OutputKey==`SpinnakerInstanceProfileArn`].OutputValue' --output text)You can easily output the value of an exported variable with
echo $VARIABLE_NAME. However, remember that unless youexportthese values they only temporarily exist in the console in which you issued the commands. You may need to reissue the above commands later in the guide if you change terminal windows, so keep them handy. -
Download this
managed.yamltemplate. This template will create thespinnakerManagedAWS::IAM::Role that Spinnaker can use.curl -O https://d3079gxvs8ayeg.cloudfront.net/templates/managed.yaml -
Execute this secondary CloudFormation deployment using the
managed.yaml. Notice that this command (and many following commands) use some of the environmental variables we assigned previously, so the first stack deployment will need to be complete first.aws cloudformation deploy --stack-name spinnaker-managed-infrastructure-setup --template-file managed.yaml --capabilities CAPABILITY_NAMED_IAM \ --parameter-overrides AuthArn=$AUTH_ARN ManagingAccountId=$MANAGING_ACCOUNT_IDIf the second step of deploying
spinnaker-managing-infrastructure-setuphasn't completed yet, feel free to skip this step for the time being and proceed with installingkubectlandAWS IAM Authenticatorbelow. Just return to this step before moving past that point.
Next Steps
You now have an EKS/Kubernetes CloudFormation stack ready for Spinnaker. You can now proceed with the deployment of Spinnaker on Kubernetes, and then move on to installing and using Chaos Monkey. If Chaos Monkey doesn't suit all your Chaos Engineering needs check out our Chaos Monkey Alternatives chapter.
How to Deploy Spinnaker on Kubernetes
This guide will walk you through the entire process of setting up a Kubernetes cluster via AWS EKS, attaching some worker nodes (i.e. EC2 instances), deploying Spinnaker to manage the Kubernetes cluster, and then using Chaos Monkey and other Simian Army tools on it! If you're looking for a simpler Spinnaker installation, you might be interested in our Spinnaker AWS Quick Start guide.
Prerequisites
Install Kubectl
We'll need to install the kubectl client and the AWS IAM Authenticator for Kubernetes, which will allow Amazon EKS to use IAM for authentication to our Kubernetes cluster.
-
Download the appropriate
kubectlbinary. Note: For the remainder of this guide we'll be using Linux examples, but most everything applies to other environments.- Linux: https://amazon-eks.s3-us-west-2.amazonaws.com/1.10.3/2018-07-26/bin/linux/amd64/kubectl
- MacOS: https://amazon-eks.s3-us-west-2.amazonaws.com/1.10.3/2018-07-26/bin/darwin/amd64/kubectl
- Windows: https://amazon-eks.s3-us-west-2.amazonaws.com/1.10.3/2018-07-26/bin/windows/amd64/kubectl.exe
curl -O https://amazon-eks.s3-us-west-2.amazonaws.com/1.10.3/2018-07-26/bin/linux/amd64/kubectl -
Change permissions of
kubectlso it's executable.chmod +x ./kubectl -
Move
kubectlto an appropriatebindirectory and add to yourPATH, if necessary.cp ./kubectl $HOME/bin/kubectl && export PATH=$HOME/bin:$PATH -
Verify that
kubectlis installed. The--clientflag is used here since we're just checking for the local installation, not making any connections yet.kubectl version --client
Install AWS IAM Authenticator
We'll follow the same basic steps as above to install the AWS IAM Authenticator as well.
-
Download the appropriate
aws-iam-authenticatorbinary.- Linux: https://amazon-eks.s3-us-west-2.amazonaws.com/1.10.3/2018-07-26/bin/linux/amd64/aws-iam-authenticator
- MacOS: https://amazon-eks.s3-us-west-2.amazonaws.com/1.10.3/2018-07-26/bin/darwin/amd64/aws-iam-authenticator
- Windows: https://amazon-eks.s3-us-west-2.amazonaws.com/1.10.3/2018-07-26/bin/windows/amd64/aws-iam-authenticator.exe
curl -O https://amazon-eks.s3-us-west-2.amazonaws.com/1.10.3/2018-07-26/bin/linux/amd64/aws-iam-authenticator -
Make
aws-iam-authenticatorexecutable.chmod +x ./aws-iam-authenticator -
Move
aws352-iam-authenticatorto an appropriatebindirectory and add to yourPATH, if necessary.cp ./aws-iam-authenticator $HOME/bin/aws-iam-authenticator && export PATH=$HOME/bin:$PATH -
Test the
aws-iam-authenticatorinstallation.aws-iam-authenticator help
Configure Kubectl
Prerequisites
- Make sure you've gone through the Deploying a Spinnaker Stack with Kubernetes section.
With everything setup you can now edit the kubectl configuration files, which will inform kubectl how to connect to your Kubernetes/EKS cluster.
-
Copy and paste the following into the
~/.kube/configfile.apiVersion: v1 clusters: - cluster: server: <endpoint-url> certificate-authority-data: <base64-encoded-ca-cert> name: kubernetes contexts: - context: cluster: kubernetes user: aws name: aws current-context: aws kind: Config preferences: {} users: - name: aws user: exec: apiVersion: client.authentication.k8s.io/v1alpha1 command: aws-iam-authenticator args: - 'token' - '-i' - '<cluster-name>' # - "-r" # - "<role-arn>" # env: # - name: AWS_PROFILE # value: "<aws-profile>"Configuring Multiple Kubernetes ClustersThis guide assumes you're just configuring
kubectlto handle a single Kubernetes cluster, but if you need to configure and handle multiple clusters the convention for doing so is to create a uniqueconfigfile for each cluster. Simply name eachconfigfile~/.kube/config-<cluster-name>, where<cluster-name>is replaced by the name of the Kubernetes cluster you already created. -
Replace the
<...>placeholder strings with the followingEKS_CLUSTER_environmental variable values from earlier:<endpoint-url>:$EKS_CLUSTER_ENDPOINT<base64-encoded-ca-cert>:$EKS_CLUSTER_CA_DATA<cluster-name>:$EKS_CLUSTER_NAME
Using a SpecificAWS::IAM::RoleIf you need to have the AWS IAM Authenticator and kubectl use a specific
Rolethen uncomment the- "-r"and- "<role-arn>"lines and paste theAWS::IAM::RoleARN in place of<role-arn>. -
Your
~/.kube/configfile should now look something like this:apiVersion: v1 clusters: - cluster: server: https://51A93D4A4B1228D6D06BE160DA2D3A8A.yl4.us-west-2.eks.amazonaws.com certificate-authority-data: LS0tLS1CRUdJTiBDRVJUSUZJQ0FURS0tLS0tCk1JSUN5RENDQWJDZ0F3SUJBZ0lCQURBTkJna3Foa2lHOXcwQkFRc0ZBREFWTVJNd0VRWURWUVFERXdwcmRXSmwKY201bGRHVnpNQjRYRFRFNE1Ea3dOakExTVRnME1BHeGFNN3QyaApzcm8wa1ZOWTdCQ1g5YVBBY09rRFVuRExGektpZTJnZVZLOFpxVHJvZEpLR0p3SEtjVDJNNUtsR0ZTSjMzSGpoCk5ZeVErTnJkd0VKT2puR2xZN3R1eVFvZjhnNU0vNWZzZSt0TWFMTjJjQ3NWNFA1NCCi93UUZNQU1CQWY4d0RRWUpLb1pJaHZjTkFRRUxCUUFEZ2dFQkFKN3owTEI5NFVoZWNwTUh0VGYrVTkxVDlxU2IKNWFVRGQrdlVTNEpVTWwwdk01OXBqc05CNDU1Z1l6ZkpLelZ1YXI5TjJOVURiREllNUJsbjlCRjWb1hEVEk0TURrd016QTFNVGcwTVZvd0ZURVRNQkVHQTFVRQpBeE1LYTNWaVpYSnVaWFJsY3pDQ0FTSXdEUVlKS29aSWh2Y05BUUVCQlFBRGdnRVBBRENDQVFvQ2dnRUJBT0h6CldrZ2pzTWZ0eEJYd3NZOGRuVXI5UUQTAzZXczazlaZHZlMWNYRlp4bHdqc3RSdWN3eUxRTG12eUh0VzJsTjE4RENqSXF5OGwxeUlYSENERQpXQjI3eHo4TXg3ZDJVSjIyaThjQ0F3RUFBYU1qTUNFd0RnWURWUjBQQVFIL0JBUURBZ0trTUE4R0ExVWRFd0V5OSTJHYjV4QU1vYjJBaWQwbEQrT2NncGdDcXQvQ3h2SlFJRGpxbjRKT1AKejh6RVkvWVVsQjBUOTVXUUFsRE9ZWnlKY3lDeWxYcFZRTnNDRWNSMFhUakRaVDFVbXMyMmk4NlozYy8xQ1IrWgpKNkNqZ3IvZkNadVVaV0VUbGt1WXhlSG5CQS91ZURJM1NsMVdnY0ZFMGFyNGxsVkVFVngyS01PZXhuM09FdHI0CjhBd1dmQWxzSUNXRWdjMjRKdzk5MG9LelNObXB0cWRaOEFwczhVaHJoZWtoNEh1blpFLzhud1prb213SE1TcTYKbjl5NFJN3RyR0xWN0RzMUxWUFBlWjkKVVB0eU1WODlieFVEeFhNV3I3d2tNRy9YckdtaC9nN1gwb1grdXRnUUtiSWdPaHZMZEFKSDNZUUlyTjhHS0krcwpIMGtjTnpYMWYzSGdabUVINUIxNXhER0R2SnA5a045Q29VdjRYVE5tdlljVlNVSy9vcWdwaXd1TU9oZz0KLS0tLS1FTkQgQ0VSVElGSUNBVEUtLS0tLQo= name: kubernetes contexts: - context: cluster: kubernetes user: aws name: aws current-context: aws kind: Config preferences: {} users: - name: aws user: exec: apiVersion: client.authentication.k8s.io/v1alpha1 command: aws-iam-authenticator args: - 'token' - '-i' - 'spinnaker-cluster' # - "-r" # - "<role-arn>" # env: # - name: AWS_PROFILE # value: "<aws-profile>" -
Save your
configfile and export theKUBECONFIGvariable to include the newconfiglocation.export KUBECONFIG=$KUBECONFIG:~/.kube/config -
Verify that
kubectlis able to use your credentials to connect to your cluster withkubectl get svc:kubectl get svc NAME TYPE CLUSTER-IP EXTERNAL-IP PORT(S) AGE kubernetes ClusterIP 172.25.0.1 <none> 443/TCP 31m
Create AWS Accounts and Roles
We now need to apply service accounts and roles to the kubectl spinnaker namespace. In Kubernetes, a namespace is a virtual cluster, which can join other virtual clusters and all be housed within the same physical cluster.
-
Issue the following commands to create the
spinnakernamespace,spinnaker-service-accountservice account, andspinnaker-adminbinding. Theapplycommand inkubectlapplies a configuration based on the passed resource (YAML files, in this case).CONTEXT=aws kubectl create namespace spinnaker kubectl apply -f https://d3079gxvs8ayeg.cloudfront.net/templates/spinnaker-service-account.yaml kubectl apply -f https://d3079gxvs8ayeg.cloudfront.net/templates/spinnaker-cluster-role-binding.yaml -
Next, we're creating the authentication
TOKENenvironmental variable.TOKEN=$(kubectl get secret --context $CONTEXT \ $(kubectl get serviceaccount spinnaker-service-account \ --context $CONTEXT \ -n spinnaker \ -o jsonpath='{.secrets[0].name}') \ -n spinnaker \ -o jsonpath='{.data.token}' | base64 --decode) -
Pass the
TOKENto the following configuration commands to setkubectlcredentials.kubectl config set-credentials ${CONTEXT}-token-user --token $TOKEN kubectl config set-context $CONTEXT --user ${CONTEXT}-token-user
Add Kubernetes Provider to Halyard
The next step is to add Kubernetes as a provider to Halyard/Spinnaker. A provider is just an interface to one of many virtual resources Spinnaker will utilize. AWS, Azure, Docker, and many more are all considered providers, and are managed by Spinnaker via accounts.
-
Start by enabling the Kubernetes provider in Halyard.4
hal config provider kubernetes enable -
Add the
kubernetes-masteraccount to Halyard.hal config provider kubernetes account add kubernetes-master --provider-version v2 --context $(kubectl config current-context)` -
Enable the
artifactsandchaosfeatures of Halyard. Artifacts in Spinnaker merely reference any external resource, such as a remote file, a binary blob, and image, and so forth. Thechaosfeature allows us to utilize Chaos Monkey, the base form of which is built into Spinnaker by default.hal config features edit --artifacts true hal config features edit --chaos true
Add AWS Provider to Halyard
Now we need to also add AWS as another provider and account. Be sure to replace <AWS_ACCOUNT_ID> with the primary/managing account ID of your AWS account.
hal config provider aws account add aws-primary --account-id <AWS_ACCOUNT_ID> --assume-role role/spinnakerManaged
hal config provider aws enable
Add ECS Provider to Halyard
The last provider to enable is ECS. We'll add the ecs-primary account to Halyard and associate it with the aws-primary AWS account added above:
hal config provider ecs account add ecs-primary --aws-account aws-primary
hal config provider ecs enable
Use Distributed Deployment
We also need to ensure Halyard deploys Spinnaker in a distributed fashion among our Kubernetes cluster. Without this step, the default configuration is to deploy Spinnaker onto the local machine.
hal config deploy edit --type distributed --account-name kubernetes-masterkubectl not installed, or can't be found by Halyard.If you get such an error when issuing the distributed deployment command above, it likely means Halyard just needs to be restarted. Simply issue the hal shutdown command to stop the Halyard daemon, then retry the deployment edit command again, which will automatically restart Halyard before executing.
Use S3 for Persistent Storage
Let's tell Spinnaker to use AWS S3 for storing persistent data (in this case, creating a small S3 bucket). Issue the following command by replacing <AWS_ACCESS_KEY_ID> with any AWS access key that has full S3 service privileges.
hal config storage s3 edit --access-key-id <AWS_ACCESS_KEY_ID> --secret-access-key --region us-west-2
hal config storage edit --type s3
Create Kubernetes Worker Nodes
Now we'll launch some AWS EC2 instances which will be our worker nodes for our Kubernetes cluster to manage.
-
Download this
amazon-eks-nodegroup.ymltemplate file.curl -O https://d3079gxvs8ayeg.cloudfront.net/templates/amazon-eks-nodegroup.yamlAdjust Worker NodesThe default template creates an auto-balancing collection of up to 3 worker nodes (instances). Additionally, the deployment command we'll be using below specifies
t2.largeinstance types. As always, feel free to modify theamazon-eks-nodegroup.yamlor instance types to meet your needs. -
Issue the following command to use the template and create your worker node collection.
aws cloudformation deploy --stack-name spinnaker-eks-nodes --template-file amazon-eks-nodegroup.yaml \ --parameter-overrides NodeInstanceProfile=$SPINNAKER_INSTANCE_PROFILE_ARN \ NodeInstanceType=t2.large ClusterName=$EKS_CLUSTER_NAME NodeGroupName=spinnaker-cluster-nodes ClusterControlPlaneSecurityGroup=$CONTROL_PLANE_SG \ Subnets=$SUBNETS VpcId=$VPC_ID --capabilities CAPABILITY_NAMED_IAM -
To connect up our newly-launched worker instances with the Spinnaker cluster we previously deployed we need to create a new
~/.kube/aws-auth-cm.yamlfile. Paste the following text intoaws-auth-cm.yaml, replacing<AUTH_ARN>with theAUTH_ARNvariable created previously (Remember, you can useecho $AUTH_ARNto print to console).apiVersion: v1 kind: ConfigMap metadata: name: aws-auth namespace: kube-system data: mapRoles: | - rolearn: <AUTH_ARN> username: system:node:{{EC2PrivateDNSName}} groups: - system:bootstrappers - system:nodes -
Apply this newly created role mapping by issuing the following command.
kubectl apply -f ~/.kube/aws-auth-cm.yaml -
Check the status of your Kubernetes nodes with
kubectl get nodes. The--watchflag can be added to perform constant updates. Once all nodes have aReadySTATUS you're all set to deploy Spinnaker.kubectl get nodes NAME STATUS ROLES AGE VERSION ip-10-100-10-178.us-west-2.compute.internal Ready <none> 2m v1.10.3 ip-10-100-10-210.us-west-2.compute.internal Ready <none> 2m v1.10.3 ip-10-100-11-239.us-west-2.compute.internal Ready <none> 2m v1.10.3
Deploy Spinnaker
-
Start by listing the current Spinnaker versions with
hal version list:hal version list -
Specify the version you wish to install with the
--versionflag below. We'll be using the latest at the time of writing,1.9.2.hal config version edit --version 1.9.2 -
Now use
hal deploy applyto deploy Spinnaker using all the configuration settings we've previously applied. This will go about distributing Spinnaker in your EKS/Kubernetes cluster.hal deploy applyHandlinghal deploy applyErrorsIn some cases you may experience a deployment error, particularly when trying your first Spinnaker deployment. Often the console output is quite vague, so the best course of action is to check your Spinnaker/Halyard log files. Typically these are located in
/var/log/spinnakerand/var/log/spinnaker/halyard. Since Halyard runs on Java, logs let you see the entire Java error stack trace, rather than the basic (and often useless) error name.Profile-relatedIndexOutOfBoundsExceptionWith recent Halyard/Spinnaker versions there's a known bug that you may experience in which an
IndexOutOfBoundsExceptionoccurs during deployment when using the AWS provider. The cause usually seems to be that Halyard is assuming an explicitregionvalue in the YAML configuration file for the AWS account being used. Even though theawsblock in the config has adefaultRegionskey, that seems to be ignored, which can cause this error. The current solution is to manually edit the primary AWS account and explicitly set theregionvalue, which should solve the issue and allow you to run a Spinnaker deployment.
hal config provider aws account edit aws-primary --add-region us-west-2That's it, you should now have a Spinnaker deployment up and running on a Kubernetes cluster, using EKS and EC2 worker node instances! Issue the hal deploy connect command to provide port forwarding on your local machine to the Kubernetes cluster running Spinnaker, then open http://localhost:9000 to make sure everything is up and running.
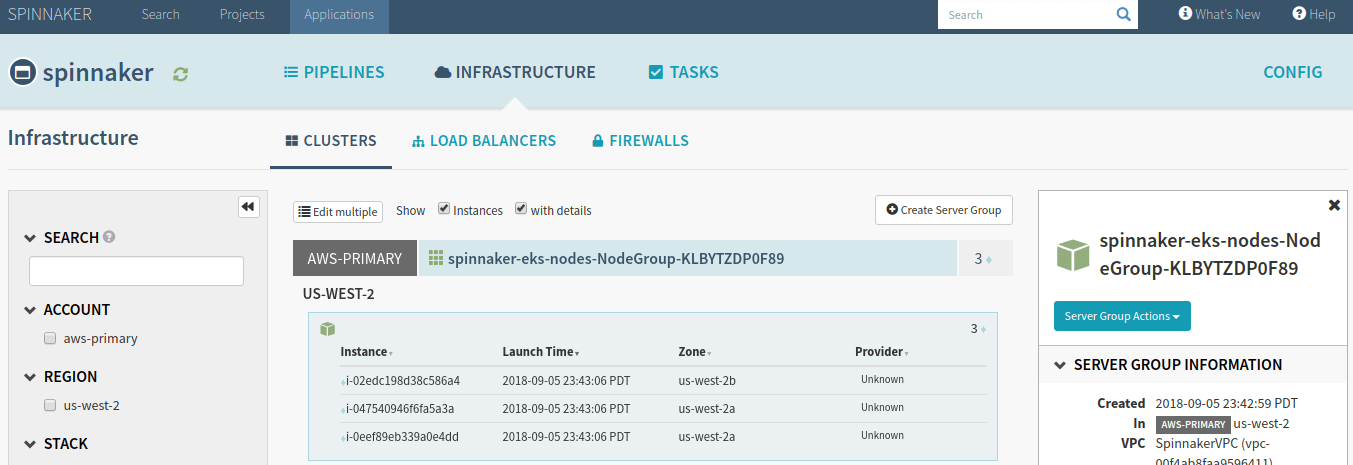
Select the spinnaker app and you should see your aws-primary account with a spinnaker-eks-nodes-NodeGroup containing your three EC2 worker node instances.
Next Steps
From here you can install and start using Chaos Monkey to run Chaos Experiments directly on your Kubernetes cluster worker nodes! Check out our How to Install Chaos Monkey tutorial to get started.