


Chaos as Code (CaC) enables you to simply, safely and securely run, schedule and manage Chaos Engineering experiments. This tutorial will demonstrate how to use Hashicorp Terraform to automate your Chaos Engineering experiments.
Hashicorp’s Terraform is an open source tool that enables you to define infrastructure as code, increasing productivity and transparency. Terraform codifies APIs into declarative configuration files that can be shared amongst team members, treated as code, edited, reviewed, and versioned.
This tutorial will walk you through building a ready-to-go Chaos Engineering environment from scratch. It will also bring you right back down to zero footprint when you no longer need the environment.
Infrastructure as code is a practice that aims to declaratively templatize the infrastructure resources. You can then version the templates in a code repository. This practice helps create an auditable trail of changes, as well as the ease of re-creating an environment anytime, almost anywhere.
In this tutorial, we will demonstrate how to use Terraform to create an EC2 instance and setup Gremlin to perform Chaos Engineering experiments. You will then perform a Chaos Engineering experiment on your EC2 instance in the form of a Gremlin Latency Attack.
This tutorial will help you get started with using Terraform, and give you an idea of how it can be used for Chaos as Code (CaC).
Time: 30 minutes
Pre-requisites
- AWS Account (see EC2 permissions in Appendix A)
- Gremlin Account (with Team ID and Secret ready - sign up here)
- Terraform (for automating resource creation)
- AWS CLI (nice to have to interact with your AWS environment)
Step 0: Verify Terraform Installation
If you don’t have Terraform installed, You can download the appropriate package here. On your local machine, verify your Terraform installation. You should see output like this:
$ terraform
Usage: terraform [--version] [--help] <command> [args]

The available commands for execution are listed below.
The most common, useful commands are shown first, followed by
less common or more advanced commands. If you're just getting
started with Terraform, stick with the common commands. For the
other commands, please read the help and docs before usage.

Common commands:
    apply              Builds or changes infrastructure
    console            Interactive console for Terraform interpolations
<...>

All other commands:
    debug              Debug output management (experimental)
    force-unlock       Manually unlock the terraform state
    state              Advanced state management
Step 1 Create the VPC Environment
For separation, create two directories, one for VPC specification and another for Instance specification.
On your local machine:
$ mkdir -p ~/terraform/vpc ~/terraform/instance
$ cd ~/terraform/vpc
Inside the vpc directory, using vim, create the following vpc.tf file. Replace the example region/az, tags, IP space and security group as required to set these up correctly for your AWS VPC.
On your local machine, create the vpc.tf file:
$ vim vpc.tfEnter the following information, changing the region, name, cidr, azs, public_subnets, owner, environment, name, and description fields with your own data.
provider "aws" {
  region = "us-west-2"
}

module "vpc" {
  source = "terraform-aws-modules/vpc/aws"
  name = "gremlin_vpc"

  cidr = "10.10.0.0/16"

  azs           	= ["us-west-2a"]
  public_subnets	= ["10.10.1.0/24"]

  tags = {
	Owner   	= "your_name"
	Environment = "chaos"
  }
}

module "security_group" {
  source = "terraform-aws-modules/security-group/aws"
  name    	= "ssh"
  description = "ssh from anywhere"
  vpc_id  	= "${module.vpc.vpc_id}"

  ingress_cidr_blocks = ["0.0.0.0/0"]
  ingress_rules   	= ["ssh-tcp","all-icmp"]
  egress_rules    	= ["all-all"]
}
This vpc.tf terraform template file uses the aws provider, defines a VPC with a single public subnet in an availability zone, and a security group within this VPC to allow SSH access.
Let’s run a couple of commands to stand up the underlying networking infrastructure.
On your local machine:
$ terraform init
$ terraform apply
Terraform will compute the resources that needs to be created, and you will then be prompted:
Do you want to perform these actions?
  Terraform will perform the actions described above.
  Only 'yes' will be accepted to approve.

  Enter a value:
Enter yes, and Terraform will go ahead and create the resources. On successful completion you will see the following result:
Apply complete! Resources: 12 added, 0 changed, 0 destroyed.Note the Security Group ID (sg-xxxxxxxx) and Subnet ID (subnet-xxxxxxxx) for later.
That’s it! With just a few commands you have created a new VPC with internet gateway, a subnet in us-west-2a, a route table for the public subnet, and a security group allowing ssh access.
Step 2: Launch an Instance that registers to Gremlin
Now that you have the underlying networking environment prepared, and let’s focus on automating the creation of an instance.
Switch to the instance directory you created in Step 1
On your local machine:
$ cd ~/terraform/instanceCreate the instance.tf template that defines the specification of the instance to launch. It references the userdata.sh script to register to Gremlin as a new client at launch. You will create this userdata.sh file at a later step.
To populate the instance.tf template, you will need the following
- EC2 SSH key name
- Security Group ID
- Subnet ID
If you do not recall the Security Group ID and/or the Subnet ID from the earlier step, you can retrieve them via the aws cli.
$ aws ec2 describe-security-groups --filters Name=group-name,Values=ssh --query 'SecurityGroups[0].GroupId' --output textThis is an example of the result you will see:
sg-91155cee

$ aws ec2 describe-subnets --filters Name=tag:Name,Values="gremlin_vpc*" --query 'Subnets[0].SubnetId' --output text
This is an example of the result you will see:
subnet-cbbd68b2
Populate instance.tf template file with the following content. Modify your_name, subnet_id, vpc_security_group_ids, and key_name accordingly.
On your local machine in the /terraform/instance directory, create the instance.tf file:
$ vim instance.tf
Note: If you are new to vim or need a refresher for vim commands, refer to this vim cheatsheet.
Enter the following information, modifying region, name, subnet_id, key_name, and Owner accordingly:
provider "aws" {
  region = "us-west-2"
}

data "aws_ami" "amazon_linux" {
  most_recent = true

  filter {
	name = "name"
	values = [ "amzn-ami-hvm-*-x86_64-gp2", ]
  }

  filter {
	name = "owner-alias"
	values = [ "amazon" ]
  }
}

module "ec2" {
  source = "terraform-aws-modules/ec2-instance/aws"
  instance_count = 1

  name                    	= "gremlin-instance"
  ami                     	= "${data.aws_ami.amazon_linux.id}"
  associate_public_ip_address = true
  instance_type           	= "t2.micro"
  subnet_id               	= "subnet-cbbd68b2"
  vpc_security_group_ids  	= ["sg-91155cee"]
  key_name                	= "changeme"
  user_data               	= "${file("userdata.sh")}"

  tags {
	Owner   	= "your_name"
	Environment = "chaos"
	DeployFrom = "terraform"
  }
}
This instance template file defines a t2.micro EC2 instance from the latest Amazon Linux AMI, to be launched in the specified subnet, with the SSH security group created earlier.
Downloading your Gremlin client certificates
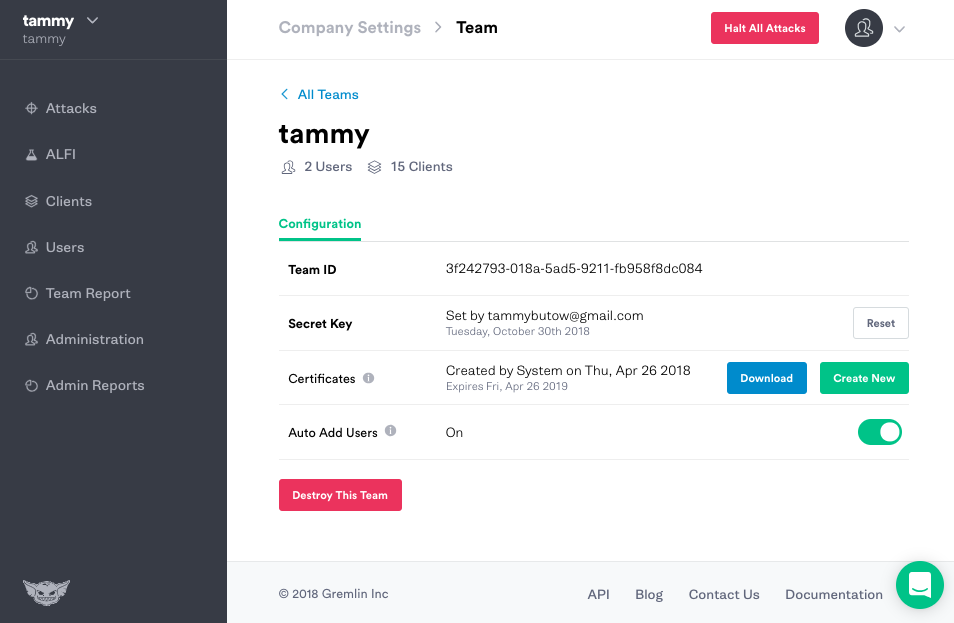
After you have created your Gremlin account (sign up here) you will need to find your Gremlin Daemon credentials. Login to the Gremlin App using your Company name and sign-on credentials. These were emailed to you when you signed up to start using Gremlin.
Navigate to Team Settings and click on your Team. Click the blue Download button to save your certificates to your local computer. The downloaded certificate.zip contains both a public-key certificate and a matching private key.
Unzip the downloaded certificate.zip on your laptop and copy the files to the server you will be using with a Linux file transfer tool such as rsync, sftp or scp. Alternatively, you can store these certificates in a storage service such as AWS S3. For example:
rsync -avz /Users/tammybutow/Desktop/tammy-client.pub_cert.pem tammy@142.93.31.189:/var/lib/gremlinrsync -avz /Users/tammybutow/Desktop/tammy-client.priv_key.pem tammy@142.93.31.189:/var/lib/gremlinNext, we will create the userdata.sh script.
Note: We do not recommend hardcoding your secret in user data for long term use. This article uses this approach for simplicity. While it is possible to base64 encode the user data to obfuscate the plaintext secret, it still is not very secure as it is straightforward to decode.
On your local machine in the /terraform/instance directory, create the userdata.sh file:
$ vim userdata.shEnter the following information, modifying GREMLIN_TEAM_ID, GREMLIN_TEAM_CERTIFICATE, GREMLIN_TEAM_PRIVATE_KEY_OR_FILEand your_name:
#!/bin/bash
yum update -y
curl https://rpm.gremlin.com/gremlin.repo -o /etc/yum.repos.d/gremlin.repo
yum install -y gremlin gremlind
export INSTANCE_ID=$(curl -s http://169.254.169.254/latest/meta-data/instance-id)
export GREMLIN_TEAM_ID=YOUR_TEAM_ID
GREMLIN_TEAM_ID="3f242793-018a-5ad5-9211-fb958f8dc084"GREMLIN_TEAM_CERTIFICATE_OR_FILE="file:///var/lib/gremlin/yourcompanyname-client.pub_cert.pem"GREMLIN_TEAM_PRIVATE_KEY_OR_FILE="file:///var/lib/gremlin/yourcompanyname-client.priv_key.pem"
gremlin init -s autoconnect --tag instance_id=$INSTANCE_ID --tag owner=your_name
This script adds the gremlin repository, installs the gremlin client and daemon, sets environment variables based on instance metadata, and finally performs gremlin init to connect as a client to Gremlin.
With everything ready, let’s run these templates.
$ terraform init
$ terraform apply
Again, indicate yes and Terraform will bring up an EC2 instance. A successful result will appear as below:
module.ec2.aws_instance.this: Creation complete after 22s
Apply complete! Resources: 1 added, 0 changed, 0 destroyed.
Now turn to the Clients page on Gremlin Control Panel.
You should see your newly brought up instance as an ACTIVE client on Gremlin. Hooray!
Step 3: Run Your First Attack in your own Chaos Environment
Prepare a new Latency Gremlin Attack targeting the newly registered instance, but do not execute the attack just yet.
- Log in to Gremlin Control Panel.
- Click Create Attack.
- Select
Networkfor Attack Category from the dropdown. - Select
Latencyfor Gremlin Attack from the dropdown. - Scroll down and select the instance you have launched earlier.
SSH into the Instance using your key file and start a ping to www.google.com
On your local machine, run the following, adding in your key and EC2 instance IP.
$ ssh -i mykey.pem ec2-user@34.214.21.96

[ec2-user@ip-10-10-1-88 ~]$ ping www.google.com
PING www.google.com (173.194.202.99) 56(84) bytes of data.
64 bytes from pf-in-f99.1e100.net (173.194.202.99): icmp_seq=1 ttl=37 time=14.5 ms
64 bytes from pf-in-f99.1e100.net (173.194.202.99): icmp_seq=2 ttl=37 time=14.5 ms
64 bytes from pf-in-f99.1e100.net (173.194.202.99): icmp_seq=3 ttl=37 time=14.4 ms
Switch back to the browser and now click Create New Attack button to execute the Gremlin Latency Attack. On the instance, you can now see the effects of the latency attack. You should see the round trip time increase by 100ms similar to the output below.
64 bytes from pf-in-f99.1e100.net (173.194.202.99): icmp_seq=8 ttl=37 time=14.5 ms
64 bytes from pf-in-f99.1e100.net (173.194.202.99): icmp_seq=9 ttl=37 time=14.5 ms
64 bytes from pf-in-f99.1e100.net (173.194.202.99): icmp_seq=10 ttl=37 time=14.5 ms
64 bytes from pf-in-f99.1e100.net (173.194.202.99): icmp_seq=11 ttl=37 time=114 ms
64 bytes from pf-in-f99.1e100.net (173.194.202.99): icmp_seq=12 ttl=37 time=114 ms
64 bytes from pf-in-f99.1e100.net (173.194.202.99): icmp_seq=13 ttl=37 time=114 ms
64 bytes from pf-in-f99.1e100.net (173.194.202.99): icmp_seq=14 ttl=37 time=114 ms
64 bytes from pf-in-f99.1e100.net (173.194.202.99): icmp_seq=15 ttl=37 time=114 ms
64 bytes from pf-in-f99.1e100.net (173.194.202.99): icmp_seq=16 ttl=37 time=114 ms
Congratulations! In a very short amount of time, you have automated the creation of a completely new environment apart from the rest of your running resources, launched an instance that connects automatically to Gremlin, and ran your first attack in this environment.
If you are feeling adventurous, we highly recommend that you play around with Terraform. Create additional subnets in more availability zones. Create private subnets that talks through NAT gateway to the internet. Increase the instance count to launch more Gremlin instances. Also take a stab at running other attacks with Gremlin in this environment.
Step 4: Cleaning up.
Let’s first terminate the instance.
On your local machine:
$ cd ~/terraform/instance
$ terraform destroy
Similar to the creation of resources, Terraform will need you to confirm if you really want to destroy the resources.
Do you really want to destroy?
  Terraform will destroy all your managed infrastructure, as shown above.
  There is no undo. Only 'yes' will be accepted to confirm.

  Enter a value:
Enter yes, and Terraform will go ahead and destroy the resources.
Destroy complete! Resources: 1 destroyed.Now go ahead and also destroy the VPC.
On your local machine:
$ cd ~/terraform/vpc
$ terraform destroy
Next time you want to spin up the environment again, simply use the templates you have used here, and you have your chaos environment within minutes.
Conclusion
By templatizing your chaos environment, you are able to quickly spin up an environment, run an attack to purposefully inject fault into the system, and return to zero footprint when you are done. Expanding on what you have achieved, if you also bring up your application within this environment, you're also able to evaluate and validate its resiliency against specific real-life operational scenarios. With the basics of running attacks down, you may want to think about running GameDays. If you need some help, here is How to Run a GameDay.
Appendix A - EC2 Permissions
You should have no issues if your user have the AdministratorAccess or AmazonEC2FullAccess policy attached. Otherwise, you will need permissions to the following API:
ec2:AssociateRouteTable ec2:AttachInternetGateway ec2:AuthorizeSecurityGroupEgress ec2:AuthorizeSecurityGroupIngress ec2:CreateInternetGateway ec2:CreateRoute ec2:CreateRouteTable ec2:CreateSecurityGroup ec2:CreateSubnet ec2:CreateTags ec2:CreateVpc ec2:DeleteInternetGateway ec2:DeleteRoute ec2:DeleteRouteTable ec2:DeleteSecurityGroup ec2:DeleteSubnet ec2:DeleteVpc ec2:Describe* ec2:DetachInternetGateway ec2:DisassociateRouteTable ec2:ModifySubnetAttribute ec2:ModifyVpcAttribute ec2:ReplaceRouteTableAssociation ec2:RevokeSecurityGroupEgress ec2:RevokeSecurityGroupIngress ec2:RunInstances ec2:TerminateInstances